WPLift is supported by its audience. When you purchase through links on our site, we may earn an affiliate commission.
Flex Pricing Review: Customize Your WooCommerce Prices Based on Who’s Buying
Ever noticed how a Big Mac costs $7.09 in Massachusetts but only $4.19 in Wyoming? Physical stores have always adjusted prices based on location and customer demographics. But online stores? We’ve been stuck with one-price-fits-all.
That’s where Flex Pricing comes in. This WooCommerce plugin lets you automatically adjust your prices based on factors like your customer’s location, income level, or device type.
In this review, I’ll walk you through my experience with this tool and help you decide if dynamic pricing could work for your store.
Flex Pricing: Overview and Key Features

Flex Pricing is a premium WooCommerce plugin focused on revenue optimization. The plugin uses data-driven algorithms to help store owners maximize their earnings through smart pricing strategies.
Unlike traditional discount plugins, Flex Pricing works at the individual customer level. This means you can fine-tune your pricing strategy based on real customer data and shopping patterns.
The plugin integrates seamlessly with WooCommerce and requires minimal setup to get started.
Key features:
- Customizable pricing rules with multiple conditions
- Real-time price adjustments
- Geographic targeting by region and postal code
- Device and operating system detection
- Time-based pricing options
- Income-level targeting capabilities
- Analytics and performance tracking
- User-friendly rule management interface
Getting Started with Flex Pricing
Setting up Flex Pricing involves a few steps, starting with creating an account and connecting your WooCommerce store. Here’s how to get everything up and running:
Initial Setup
- Create a free account at flexpricing.com
- Download the plugin ZIP file from your account dashboard
- Install the plugin in WordPress (Plugins > Add New > Upload Plugin)
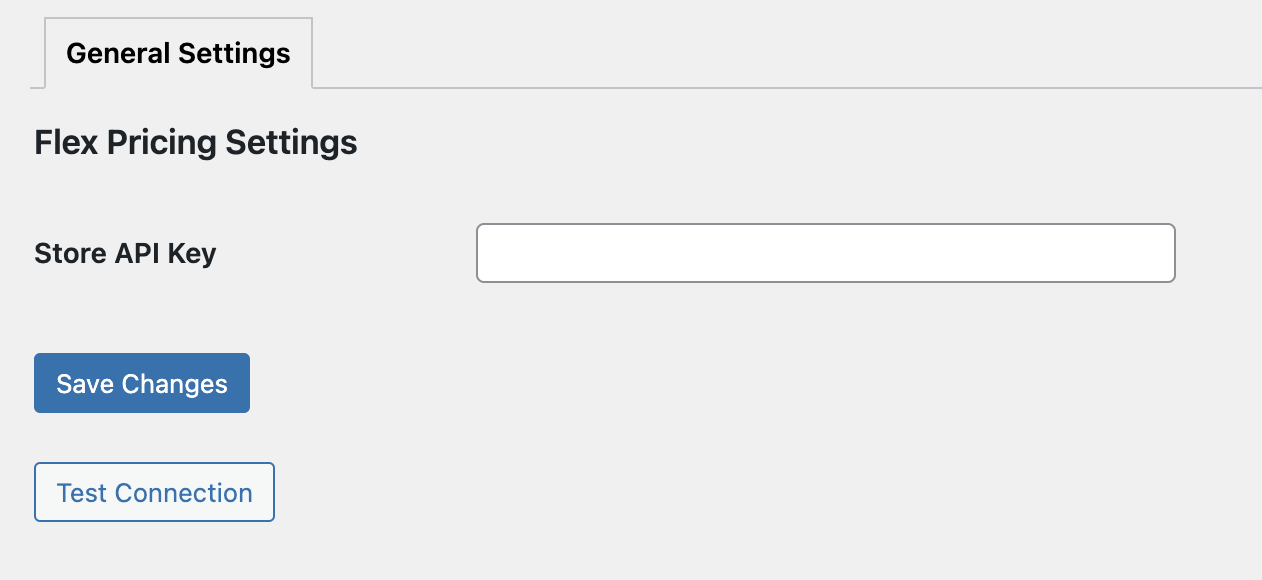
- Activate the plugin and enter your store’s API key in the settings
- Wait about 30 minutes for your product catalog to sync
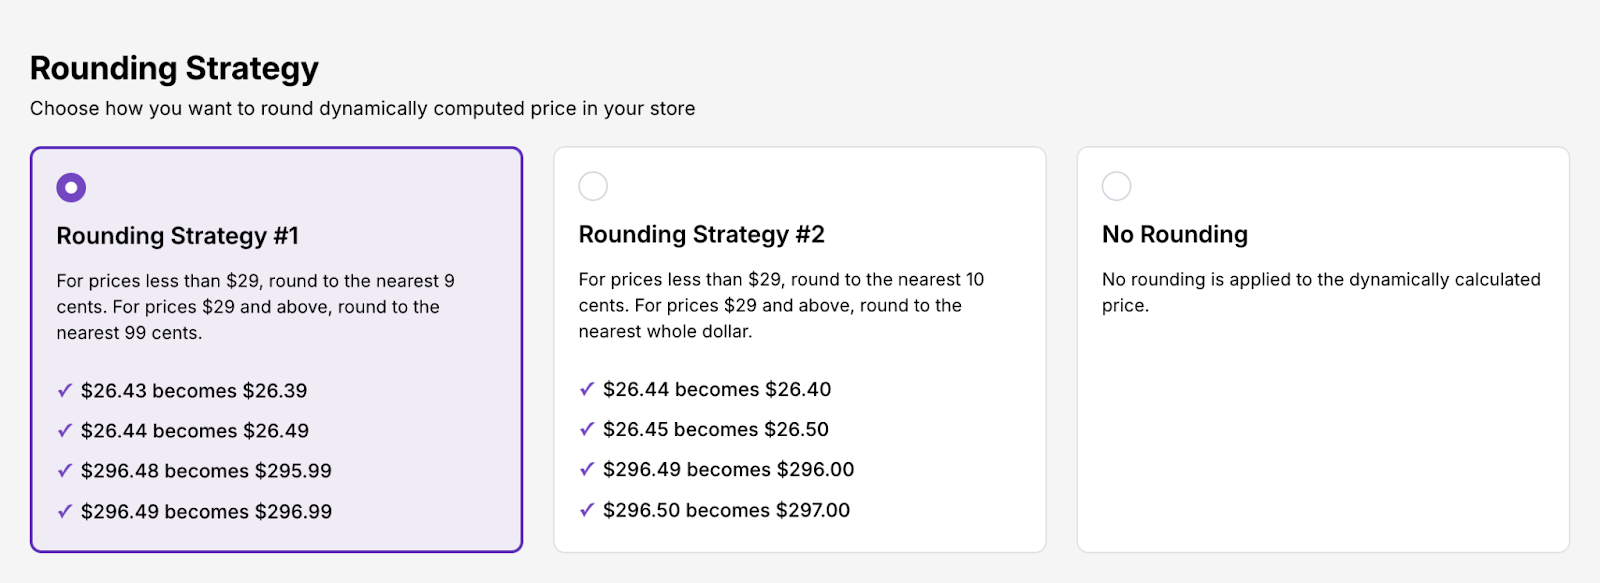
Once the initial setup is complete, you’ll need to configure your pricing strategy. The most important setting to consider first is your rounding strategy. Flex Pricing offers three options:
- Strategy 1: Rounds to nearest 9 cents (under $29) or 99 cents ($29+)
- Strategy 2: Rounds to nearest 10 cents (under $29) or whole dollar ($29+)
- No Rounding: Keeps exact calculated prices
I found Strategy 1 worked best for most stores, as it maintains pricing that looks natural to customers while optimizing your margins.
Note: Make sure to check your connection status in the settings panel after setup. A green indicator means everything’s working correctly.
Hands-On With Flex Pricing
In this section, I’ll walk you through using Flex Pricing’s core features. Whether you’re creating custom rules or using pre-made ones, you’ll see how to implement dynamic pricing on your store.
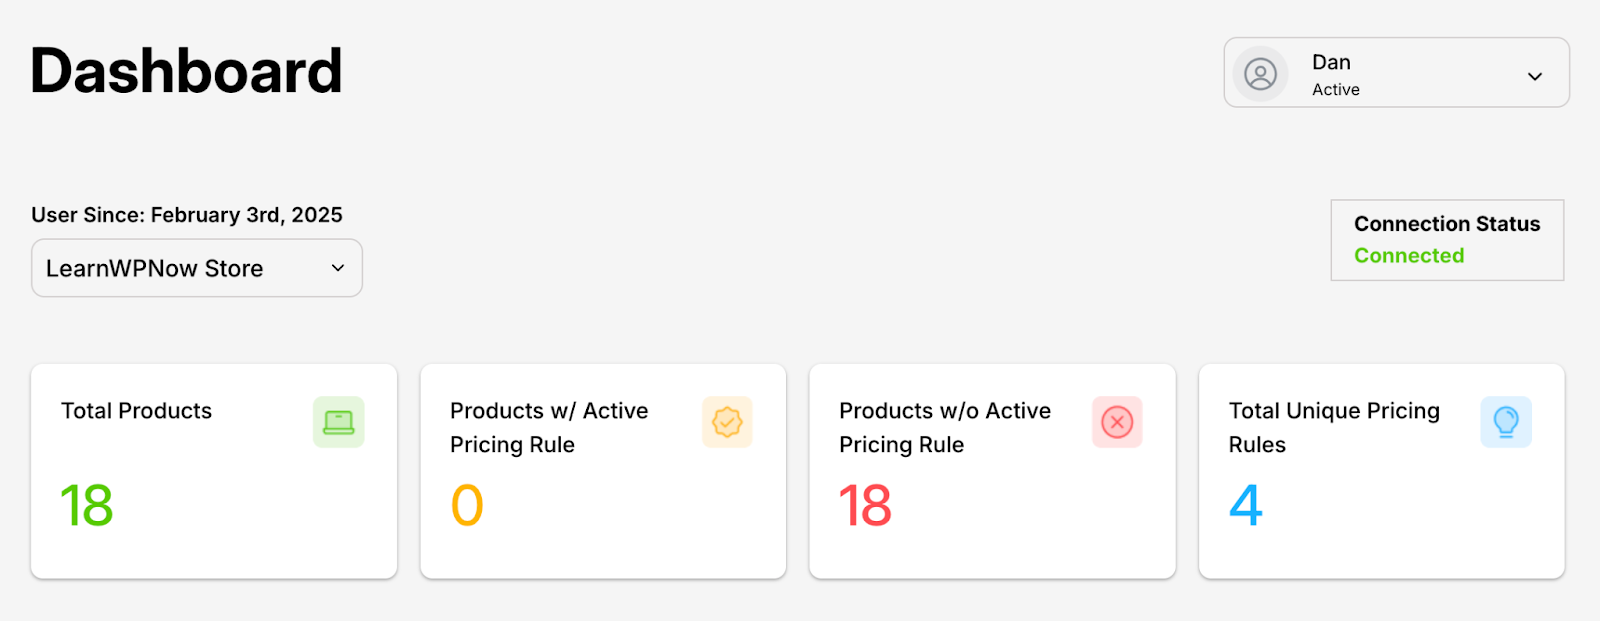
The Dashboard
The dashboard gives you a bird’s-eye view of your pricing strategy. You can track key metrics like total products, active pricing rules, and which products have rules applied. I could see that out of my 18 products, none had active pricing rules yet—giving me a clear starting point.
Creating and Applying Rules
The Pricing Rules section offers two approaches: create your own rules or use pre-made ones.
Creating Custom Rules
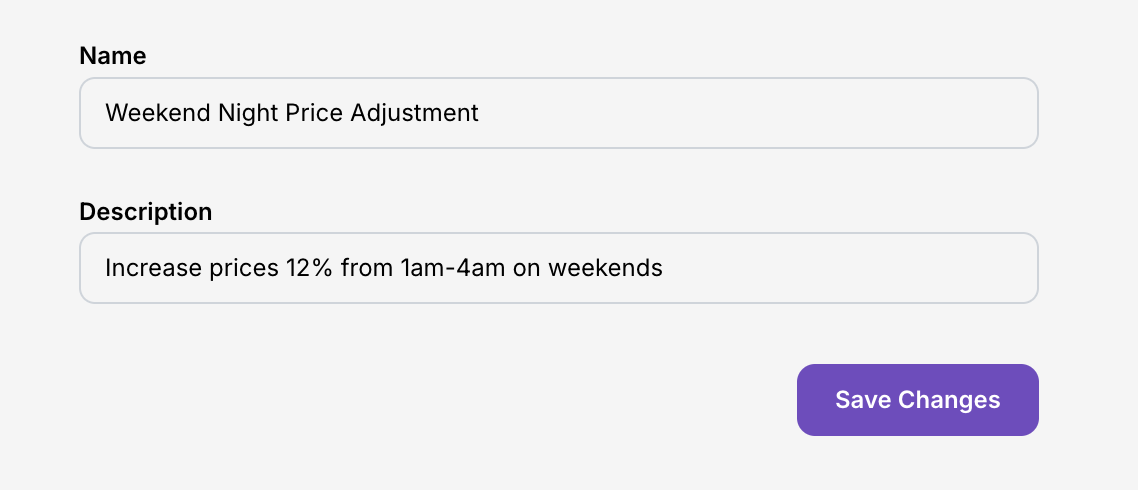
When you click New Pricing Rule, you’ll see fields for Name and Description. Choose names that will be easy to recognize later when managing multiple rules. The description helps you remember the exact adjustments without having to open the rule settings.
Let’s say you want to increase prices during weekend late nights. You might name it “Weekend Night Pricing” with a description “Increase prices 12% from 1am-4am on weekends.”
After naming your rule, you’ll find a comprehensive set of attributes to build your pricing logic. These are organized into four main categories:
User attributes:
- Estimated Income of User
- User’s Operating System
Location rules:
- Distance from store
- State User is in
- Zip Code User is in
Stock rules:
- Units Remaining in Stock
Time & date rules:
- Date
- Month
- Day(s) of Week
- Time
- Holiday
Each attribute uses an “if-then” logic structure. For example, you can create a rule like “if Holiday is New Year’s Day then increase price by 10%” or combine conditions like “if Time is between 12:00 PM and 4:00 AM then decrease price by 10%.”
The interface makes it easy to build complex rules using multiple conditions. You can add additional conditions using the “Add Condition” button or create alternative scenarios with the “Add or if” option.
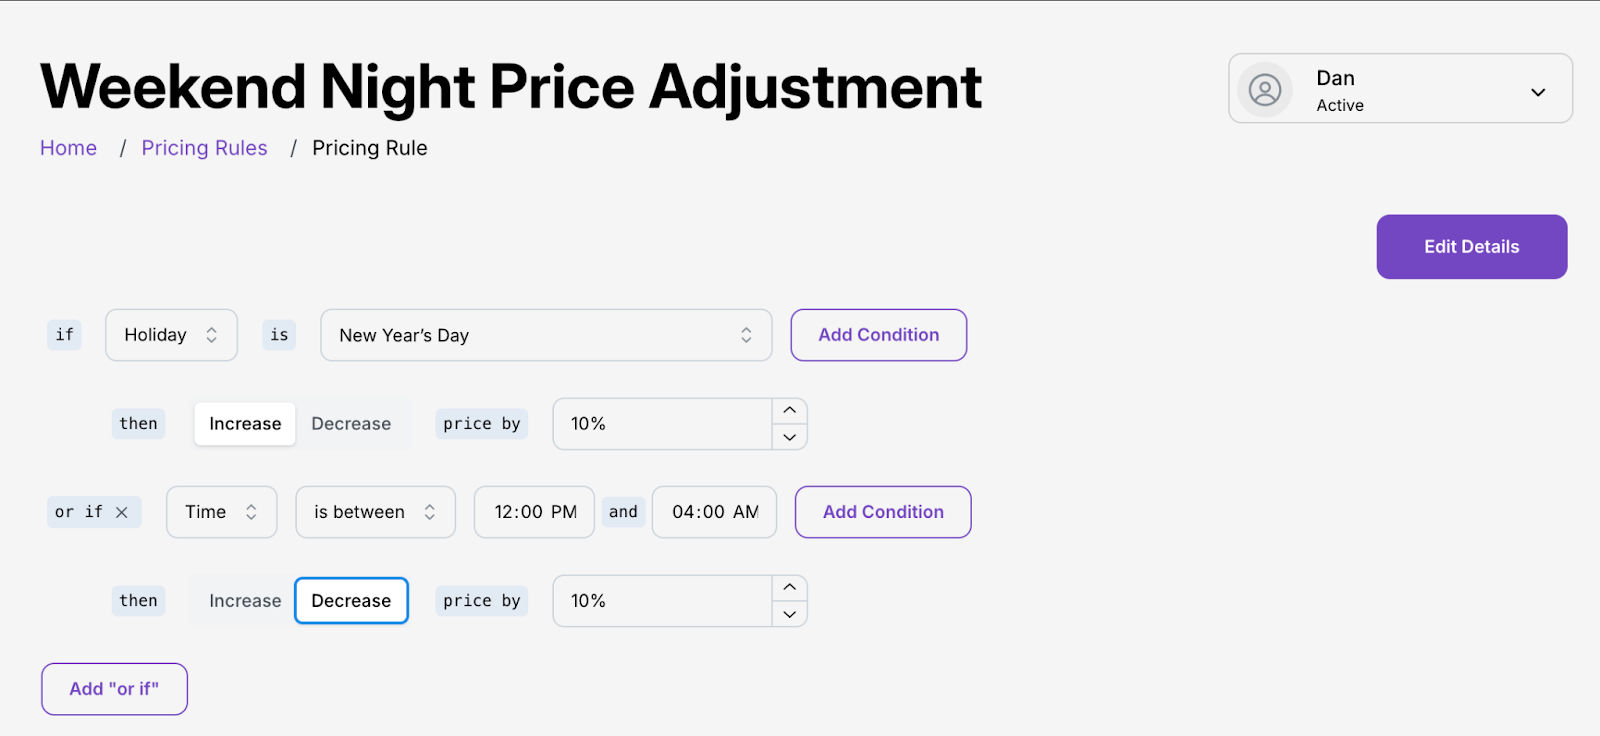
This flexibility lets you create sophisticated pricing strategies. Whether you want to adjust prices based on a customer’s location, time of purchase, or device type, the rule builder helps you implement your strategy with precise control.
Using a Pre-Made Rule
The pre-made rules are particularly interesting, backed by research and real-world examples. For instance, the device-based rule mirrors DoorDash’s strategy of adjusting prices based on whether customers use iOS or Android devices.
Available pre-made rules include:
- Income-based rule: Adjusts prices based on local income levels. Research shows 70% of low-income shoppers focus on price, whereas only 18% of high-income shoppers make it their primary consideration.
- Shipping distance rule: Balances pricing with shipping costs. Offers better prices to nearby customers while adjusting for higher shipping costs to distant locations.
- Inventory-based rule: Manages stock levels through dynamic pricing. Automatically discounts overstocked items and increases prices for limited stock.
- Device-based rule: Like DoorDash, this rule adjusts prices based on the customer’s device. Research indicates iOS users typically have higher spending power than Android users.
- Time of day rule: Based on research showing customers are most price-sensitive in the morning and least sensitive around 11 PM.
- State CPI rule: Adjusts prices based on local market expectations, using U.S. census data to account for regional cost differences.
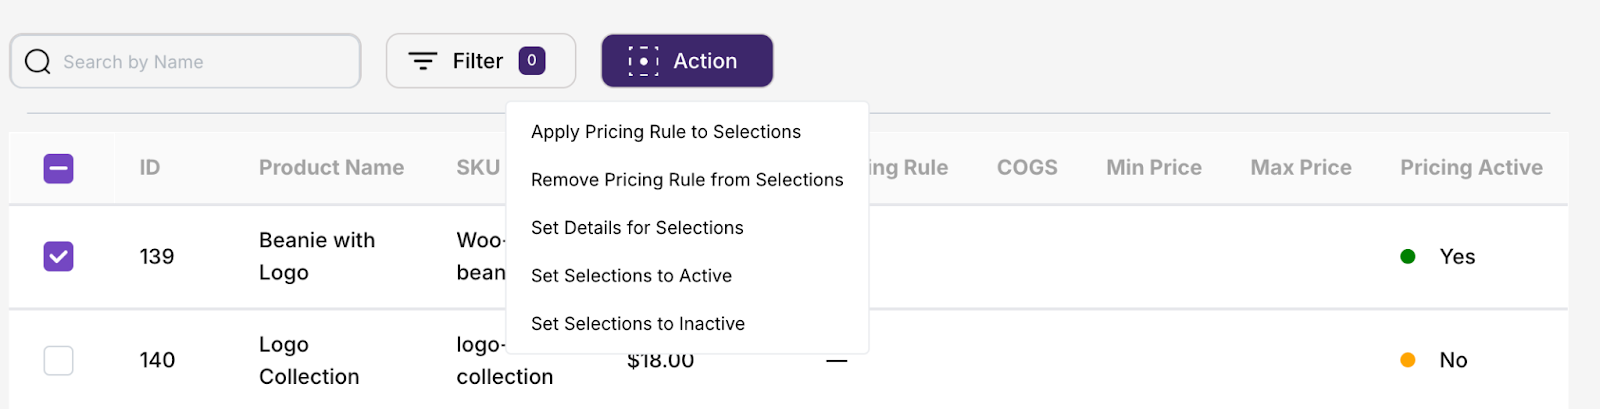
Once you’ve selected a rule, applying it to your products takes just a few steps:
- Navigate to the Products tab
- Select your target products using the checkboxes
- Click the “Action” button
- Choose “Apply Pricing Rule to Selections”
- Pick your rule from the dropdown menu
- Click “Apply” to confirm
- Click “Set Selections to Active” from the same “Action” menu.
Support and Resources
Flex Pricing provides several support options:
- Video tutorials for common tasks and setup guidance
- FAQ section for troubleshooting
- Direct support through their contact form
- Pre-made rule examples with detailed explanations
This support structure helps both new users getting started and experienced users looking to optimize their pricing strategies.
Final Verdict
If you’ve ever wished you could adjust your store’s prices based on who’s shopping, Flex Pricing makes this possible.
You can charge different prices based on location, timing, or even device type, all while the plugin handles the complex calculations automatically.
The pre-made rules give you proven pricing strategies to start with, or you can create your own to match your store’s specific needs.
For WooCommerce stores looking to increase revenue through better pricing, Flex Pricing removes the technical barriers and lets you focus on your strategy.
Ready to tap into the power of dynamic pricing?
CTA: Install Flex Pricing